How to publish API level specific Android library implementations to Maven Central
So what’s this article all about? I’m sure the title can’t be any more puzzling…
I’ve recently gradlefied one of my open-source libraries: Android-UndoBar
One of the requirements was to offer two implementations. One variant with minSdkVersion set to API Level 8 using nineoldandroids for the animations and another variant for API Level 15 using the native animations framework. The reason being that developers targeting API Level 15 or later shouldn’t have to include the 9OA library which is about 110 kb in size.
Ok, so Gradle’s declarative build system seems to be the perfect problem solver for this. Let’s start with the build.gradle file:
Firstly, we have to obviously specify the different API levels we wanna target. The productFlavors closure is the right place for this:
productFlavors {
        api8 {
            minSdkVersion 8
        }
        api15 {
            minSdkVersion 15
        }
    }
Secondly, we need to tell Gradle to publish all variants of our library which results in multiple .aar files being created:
defaultPublishConfig "api15Release"
publishNonDefault true
Also, since we’re now publishing multiple variants, we should specify a default config. I picked the API level 15 variant in my case. Note that you need to specify the full build variant, so it’s api15Release and not just api15.
You can read more about these commands for library publication in the official user guide.
Finally, don’t forget to list your dependencies. Since we only wanna include the 9OA library for the variant targeting API level 8, we use api8Compile instead of just compile.
dependencies {
    api8Compile files("libs/nineoldandroids-2.4.0.jar")
}
Kuul, so that’s the Gradle part done.
Next, let’s write some Java!
To restate the problem: For api8 we wanna use the 90A library to perform the animations, for api15 the native animations framework.
So, how are we gonna do that? The main idea is to create an interface or an abstract base class to hold common logic and provide two API level specific implementations of it.
Here’s an excerpt of the base class. I decided to call it ViewCompat:
public abstract class ViewCompat {

    protected final View mView;

    public ViewCompat(View view) {
    	mView = view;
    }

    protected abstract void animateIn(long duration);

    /* omitted for brevity */
}
It just keeps a reference to the view we wanna animate and lists some abstract animation methods. No big deal.
And now the two API level specific implementations. ViewCompatImpl for API Level 15:
import android.view.ViewPropertyAnimator;

public class ViewCompatImpl extends ViewCompat {

    private final ViewPropertyAnimator mViewPropertyAnimator;

    public ViewCompatImpl(View view) {
        super(view);
        mViewPropertyAnimator = view.animate();
    }

    @Override
    protected void animateIn(long duration) {
        mViewPropertyAnimator.cancel();
        mViewPropertyAnimator.alpha(1)//
                .setDuration(duration);
    }

    /* omitted for brevity */
}
ViewCompatImpl for API Level 8:
import com.nineoldandroids.view.ViewPropertyAnimator;

public class ViewCompatImpl extends ViewCompat {

    private final ViewPropertyAnimator mViewPropertyAnimator;

    public ViewCompatImpl(View view) {
        super(view);
        mViewPropertyAnimator = ViewPropertyAnimator.animate(view);
    }

    @Override
    protected void animateIn(long duration) {
        mViewPropertyAnimator.cancel();
        mViewPropertyAnimator.alpha(1)//
                .setDuration(duration);
    }

}
As you can see the code is pretty similar. The crucial difference is the import and use of android.view.ViewPropertyAnimator; vs com.nineoldandroids.view.ViewPropertyAnimator. It’s native animations vs 90A.
So assuming you comply with the default Android project structure, your library module should look something like this:
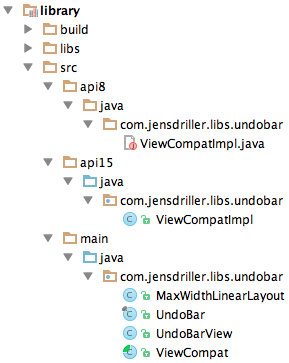
The ViewCompat interface resides in the main folder whereas the two API level specific implementations should be placed in respective api8 and api15 folders based on the product flavors we have defined earlier on.
So that’s it. If you now create an instance of your ViewCompat class, like so
ViewCompat viewCompat = new ViewCompatImpl(view);
Gradle will make sure to pick up the right implementation for you depending on the variant you are building. If you’re using Android Studio you will see that the java package of the selected build variant gets a blue tint just like the main java source package. So you can see right away which implementation is currently being used and will be picked up by the build system. Classes of other, inactive variants are badged with a red exclamation mark. Pretty cool!
One more thing: If you’re publishing your library to Maven Central (and you really should!), you have to specify the full build variant in your dependencies, just like this:
compile 'com.github.jenzz.undobar:library:1.1:api15Release@aar'
or
compile 'com.github.jenzz.undobar:library:1.1:api8Release@aar'
It’s not really nice, but it works!
If you’re aware of better, cleaner way to achieve this, please let me know in the comments.